Fine-tuning LLMs on Your Own Data
Large Language Models like BERT, RoBERTa, and GPT have been pretrained on massive text corpora. But when it comes to solving specific tasks, like classifying customer reviews, summarizing legal documents, or tagging support tickets, you’ll want the model to learn from your data. So, in this article, I’ll take you through a complete guide to fine-tuning LLMs on your own data using Hugging Face Transformers.
Step-by-Step Guide to Fine-Tuning LLMs on Your Own Data
Before getting started, make sure to install these Python libraries:
pip install transformers datasets tensorflow torch
Make sure you’re using the latest version of transformers to avoid compatibility errors.
Step 1: Load a Dataset Using TensorFlow Datasets
Before diving into model training, it’s essential to load and understand the dataset you’re working with. In this step, we’ll use TensorFlow Datasets (TFDS) to load the ag_news_subset dataset, a popular text classification benchmark containing news headlines categorized into four classes (World, Sports, Business, Sci/Tech):
import tensorflow_datasets as tfds

ds, info = tfds.load('ag_news_subset', with_info=True, as_supervised=True)

train_ds, test_ds = ds['train'], ds['test']

for text, label in train_ds.take(1):
    print("Text:", text.numpy().decode())
    print("Label:", label.numpy())
Text: AMD #39;s new dual-core Opteron chip is designed mainly for corporate computing applications, including databases, Web services, and financial transactions.
Label: 3
This dataset is clean, well-structured, and ideal for demonstrating how to fine-tune language models on custom data.
Step 2: Preprocess the Data
Now, the next step is to prepare the data for input into our language model. Pretrained models like BERT expect text in a specific tokenized format, where each word or subword is converted into a numerical ID using the same tokenizer that was used during the model’s original training.
This step ensures consistency between how the model was trained and how it will now see your custom data:
from transformers import AutoTokenizer

model_checkpoint = "bert-base-uncased"
tokenizer = AutoTokenizer.from_pretrained(model_checkpoint)

def tokenize_batch(texts, labels):
    tokens = tokenizer(list(texts), padding='max_length', truncation=True, max_length=128, return_tensors="pt")
    tokens["labels"] = labels
    return tokens
In the code above, we load the tokenizer associated with bert-base-uncased and define a helper function to tokenize a batch of text examples. This function also applies padding and truncation to keep sequence lengths uniform, something crucial for efficient training and batching.
With the tokenizer ready, our next task is to convert the TensorFlow Datasets (TFDS) format into something that can be directly used by the Hugging Face model, which expects PyTorch-style inputs.
Since TFDS provides the data as TensorFlow tf.data.Dataset objects, we need to extract the raw text and labels, convert them to NumPy arrays, and then tokenize them using our helper function:
import torch

def tfds_to_torch(dataset):
    texts, labels = [], []
    for text, label in tfds.as_numpy(dataset):
        texts.append(text.decode())
        labels.append(label)
    return tokenize_batch(texts, torch.tensor(labels))

train_encodings = tfds_to_torch(train_ds)
test_encodings = tfds_to_torch(test_ds)
This step bridges the gap between data loading and model training by transforming our dataset into tokenized tensors, complete with input IDs, attention masks, and labels, all formatted for efficient use with PyTorch and Hugging Face’s Trainer API.
Step 3: Create a PyTorch Dataset
At this point, we’ve tokenized our text data and structured it into tensors, but to feed it into a PyTorch training loop or the Hugging Face Trainer, we need to wrap it inside a custom Dataset class. This class acts as a bridge between the raw tokenized data and the model, allowing us to define how batches are loaded during training:
from torch.utils.data import Dataset

class AGNewsDataset(Dataset):
    def __init__(self, encodings):
        self.encodings = encodings
    def __len__(self):
        return len(self.encodings['input_ids'])
    def __getitem__(self, idx):
        return {key: val[idx] for key, val in self.encodings.items()}

train_dataset = AGNewsDataset(train_encodings)
test_dataset = AGNewsDataset(test_encodings)
By implementing __len__ and __getitem__, we enable PyTorch to efficiently index, shuffle, and batch the data. The code above creates this custom dataset class and initializes it for both the training and test sets, preparing our data for seamless integration with the training pipeline.
Step 4: Load the Pretrained Model for Classification
Now that our dataset is tokenized and wrapped in a PyTorch-compatible format, it’s time to load the pretrained language model that we’ll fine-tune. In this case, we’re using bert-base-uncased, a widely used version of BERT that has been trained on a large corpus of English text.
Since our task is text classification with four output classes (news categories), we’ll load the model with a classification head on top and specify num_labels=4:
from transformers import AutoModelForSequenceClassification

model = AutoModelForSequenceClassification.from_pretrained(model_checkpoint, num_labels=4)
This ensures that the model’s final layer is tailored to our specific task. The following code initializes the model architecture and prepares it for training on our custom dataset.
Step 5: Set Up the Training Loop
With the model, tokenizer, and datasets ready, the next step is to configure how the training process should run. Instead of manually writing a training loop, we’ll leverage Hugging Face’s Trainer API, which handles everything from optimization to evaluation and logging.
To do this, we first define TrainingArguments, where we specify essential training parameters like batch size, number of epochs, evaluation strategy, and logging frequency. These settings give us control over the model’s learning behaviour and how often we monitor its progress:
from transformers import TrainingArguments, Trainer

training_args = TrainingArguments(
    output_dir="./results",
    do_train=True,
    do_eval=True,
    eval_steps=100,
    save_steps=100,
    per_device_train_batch_size=16,
    per_device_eval_batch_size=16,
    num_train_epochs=3,
    logging_dir="./logs",
    logging_steps=10,
)

trainer = Trainer(
    model=model,
    args=training_args,
    train_dataset=train_dataset,
    eval_dataset=test_dataset,
    tokenizer=tokenizer,
)
This prepares everything for a smooth and scalable training process with minimal boilerplate code.
Step 6: Training the Model
With everything configured and the model ready, it’s time to kick off the training process. By calling the trainer.train(), we begin fine-tuning the pretrained BERT model on our custom dataset, allowing it to learn patterns specific to our text classification task:
trainer.train()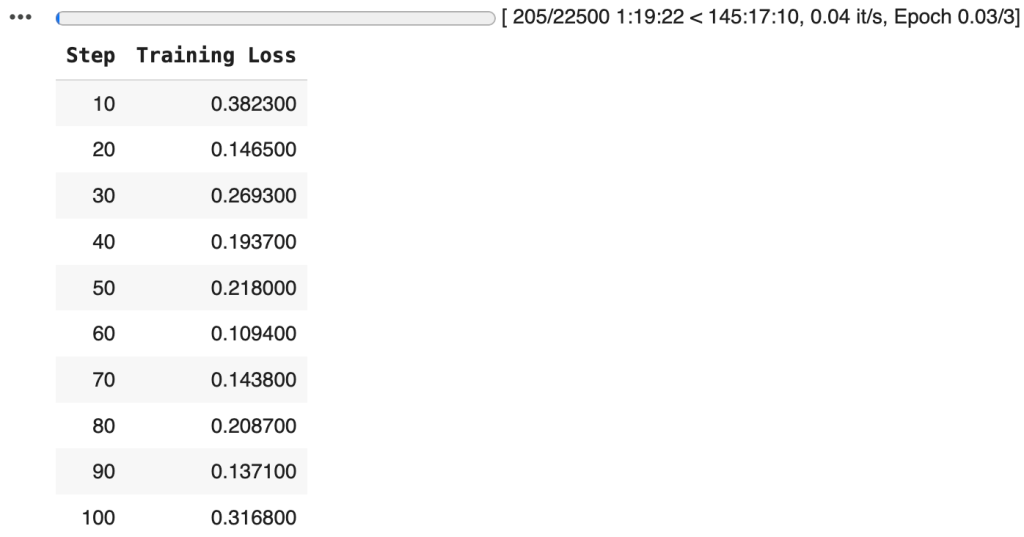
With the training pipeline complete and the model fine-tuned on our custom dataset, the next important step is to persist the trained model and tokenizer:
model.save_pretrained("./fine-tuned-bert-agnews")
tokenizer.save_pretrained("./fine-tuned-bert-agnews")
This allows us to reuse them without retraining, making it easy to deploy the model for inference, share it with others, or load it back into memory for additional training.